Tuesday, September 10, 2013

Christmas Decor Designs

I am booking for Christmas tree & decor services now!!!  We can use your decor and add special touches or start from scratch with any color or theme design.  Check out some of the photos below for a few ideas....


A Simply Southern Christmas Tree -  Burlap,  Fleur De Lis, Mercury Glass and Magnolias.......  

The Mercury Glass and Fleur de lis help to give the tree a beautiful sparkle.  I love using the mercury glass as it is not gold and not  silver.  It is a perfect mix of the two giving the tree a champagne, shimmery,  glow.......


      Burlap ribbon and flowers as well as the glittered magnolias give nice texture to the Christmas Tree.  They all help to contribute to a simple and organic Southern Christmas Tree........


    Burlap Wreath........ Accented with a wide shimmery ribbon and a glittered magnolia 

  We hung the wreath over a mirror to give it a special home for the holidays


( this wreath can be used for different seasons/holidays by simply changing out the bow) 


 The final touch for this home was the Burlap stockings trimmed with an off white linen cuff.  I simply added glittered initials to personalize each stocking.


A Formal Christmas Tree    Golden and Bronzed..........

Bronze is a  modern take on the traditional red.  It also helps to give a warm contrast to the bright gold ornaments.  Together these colors create a beautiful, glowing tree.........


 A Traditional Christmas Tree ......... Red and Gold

We used red, gold and glass ornaments from Frontgate as well as a few larger ornament accents from Pier One.  There are  3 different styles of red and gold ribbon with varying widths.  We let it drape and curl down from the topper and throughout the entire tree.   The ribbon softens the tree and gives it such an elegant feel. It also gives the tree more presence and makes it feel fuller...


    Tree Topper .... with poinsettias, pine cones and branches with red and gold ribbon.  This tree is actually only a 9 - foot tree but with the topper it is close to 10 1/2.  


We added red and gold accents throughout with  greenery, ribbon, glass balls and garland to carry our theme throughout the home.  


    We used shatter proof ornaments on the garland as there are small little hands going up and down those             stairs.


A Whimsical Christmas Tree -  RED, SILVER and WHITE and CANDY CANE STRIPES!!!!!

We used red and silver mesh as a bow/topper with long pieces flowing down and meandering through the tree.  This tree has lots of twirly, whimsical decor accents that are placed through out  the tree as well as candy cane and peppermint balls on wire sticks mixed into the topper.  It looks good enough to eat!!!!


   A whimsical center piece made with Nutcrackers, Glass (candy filled) jars and red berry greenery mixed with candy canes and peppermints......


Wednesday, January 30, 2013

Lets Get Creative!!!! An organized "Craft Room"


Challenge: This craft space needed to serve as storage and work space for a busy, creative family.


Goal:  The primary goal was to implement labeled storage that gave each item a home as well as organize it into zones:
 Books   - Arts/Crafts  - Paper  - Wrapping - School/Office supplies  - Sewing/Knitting 


                                       Before 
All items were removed from craft area and sorted by type.  Once I knew how much of each item, I could create a space plan to accommodate those items and maximize the storage space  


                                        After
Zones were created by putting like items together to make it easier for the family to find the items they need as well as return them to their home.  For example, the horizontal stacked trays became home to the different types of paper the client uses.  The containers above the paper with smaller drawers are for small arts/craft items such a goggle eyes and other small craft items.  The top shelf became home to all the family's arts/craft kits - such as beading kits, mosaic, etc.


                                         Before
Client had already purchased storage containers, but they were not storing or organizing efficiently.


                                        After
Again, All items were removed from closet and sorted and then put into labeled storage containers based on size and type.

The shelf to the right was the perfect depth to store the clients movies so we actually moved them from a box the homeowner was storing.  Now they family can see the videos they have and are more likely to watch them.


                                        Before
                            All books were taken off shelf and sorted by type and size.


                                          After
After the books were sorted and organized by type and size ( ex: board books, chapter books, etc) they were returned to the shelf.  We utilized the top shelf space for the client's mailing and work supplies.  This also kept these items out of reach from little hands.

On the floor, beneath the books, we created 2 storage bins labeled with each child's name.  It creates a quick home for mom to put their school  or art work in and she can go through  it later and decide what she wants to keep.  This will help keep the clutter off the counter space.


                                                             After

                             A home for school/office supplies


Thursday, December 13, 2012

Closet Systems and Planning

There are many closet systems available to make over your closet and they range in price from $150 - $4,000 depending on the size and design options you chose for your space.  A  few of the closet systems manufacturers are as follows:

Container Store
Closet Factory
Closets By Design
Closet Maid
Easy Track/ORG

You can have the company install your closet system or you can save money by planning and installing  it yourself.  Space Planning is key to maximizing the storage space to accommodate your closet inventory.  Here are some tips from ClosetMaid and EasyClosets.com:

1.  Take inventory: make a detailed, itemized list of everything stashed in a closet and then you can determine how much space you will need for short and long- hanging items as well as whether you need drawers, shelves or both.

2.  Plan for various heights: Measure shoe heights for tall heels and boots as well

3.  Do the Math: Plan your hanging storage around the length of your clothes.

Standard vertical measurements  for clothing items:

Women's Shirts: 36-40 in long
Men's Blazers and Shirts: 38-42 in long
Women's Skirts: 38-42in long
Women's long dresses and Coats: 60-70 in long
Women's cocktail dresses and pants hung by cuffs: 48-50 in long
Double-hung pants: 20 in long


 Make Over Your Closet: 
go to bhg.com/closetguide for a complete closet system guide

Wednesday, December 12, 2012

An Organized Pantry


Pantry Before


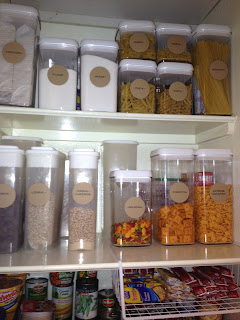
Pantry After - (with added air tight containers, can  3 tiered organizer and door shelf)  
I actually removed some of the wooden shelves to accommodate taller items that I had or would be putting into air tight containers.   

I purchased the door storage at Home depot for about $30 and it gave me additional storage for items that I would not be putting into air tight containers.  

The Air tight containers were purchased at Walmart (Better Homes and Garden line).  Prices range from $4.99 - $9.99 depending on size and shape.  The 3 tiered can shelf also came from Walmart and it expands.  There is also a great organizer for cans that I really want that can hold a ton of cans and utilizes the space really well from organize.com, however it is a little pricey at $39.99 and since I was having to purchase all the plastic containers as well, I will wait on that splurge, but not too long!!!!


Here Comes the Labels!!!! The labels on the baskets are gift tags that I tied onto the baskets for items like bread and chips with jute rope.  The craft paper labels on the plastic containers in the wall shelf are Martha Stewart - Craft labels  from Staples.  Martha Stewart  (for Avery) has a huge selection of organizing labels at Staples including chalkboard labels.  


Ahhhh.... clean, organized and easy to find
I store extra supplies behind these beautiful plastic containers so I am able to easily refill as they are used,  but I don't  have to look at all the boxes and packaging.  The labels I used are also craft paper labels but I wanted them to be a little bigger so I went with a circle shape.  These are  from Avery  (You can get them at Office Depot or Walmart).  You can go online to avery.com/print and download the templates for any of these labels by just putting in the number it gives you.  


Happy Organizing!!!!

Tuesday, December 11, 2012

Turn a small closet into an office you will love....

Tucked away in my guest room closet, I found the perfect space to organize my personal home office.  Most would really like this idea as you can close the doors and not have to look at any of the mess or clutter most home offices have, however, this is now a space I am proud to show off and keep the doors open!!!

My husband was a big help with this project.  He made a template out of cardboard to measure the space for a counter top.  This space had some tough angles so we  had to make sure we measured correctly         (  remember measure twice and cut once or in our case measure twice and re cut several times) Its ok, my husband does not read this blog ( I hope).

We purchased a laminate counter top that resembled granite at home depot ( around $50) and transferred our template onto the back side.  We then found the studs in the wall and attached  1x2 all along the wall where the counter top would attach to give it extra support and a surface for us to attach the counter top to.  ( I am sorry I do not have any before or along the way photos, I was not a blogger then, just an obsessed home organizer)


Now onto the organizing........!!!!!!

I purchased this great bulletin board with open compartments at the bottom at my favorites store,  Marshall's-Home Goods. I can put info on the bulletin board and then keep smaller items like pens, pencils, markers, scissors, etc stored and up off the counter top.  Anytime  you can organize and store things vertically, you are creating extra space and keeping your work space clutter free.

I also hung a black wicker wall filing system (yes, found at the greatest store on earth - Marshalls).  I put paper and file folders in this and again this really helps keep my desk top clean and clear for me to do art projects or sewing. (lucky for me the builder put a plug in this closet so  I can use my sewing  and laminating machine there and plug in a task lamp for projects..... love it!!!).  Lastly, I added the black magazine organizers (from Container Store) to hold paper, labels, magazines, and catalogs.  I liked these because they camouflaged all the clutter for me and I could label them for easy reference.  There are many stores like Target, Walmart and yes even Marshalls that carry these in different finishes from plastic to fabric to even wicker.  You just have to shop around and find the style that works for your space.  I wanted to keep it clean and modern in this space and not have a lot of distractions while I was working  and creating in the space.


We removed the larger clothes hanging rod that went across to entire closet and I bought a smaller dowel rod that could hold ribbon spools and only hung it over half the closet. to keep the space more open in front of the bulletin board.


There was still a little space underneath the counter top and as any other obsessed organizer would do, I had to make use of every last inch, so I found a plastic container on wheels (Container Store) that can hold supplies.  I store all my crafting supplies like hot glue gun, glues, stamping, labels, sewing supplies, etc. in these drawers.  I can roll it out for better access and tuck it back under out of the way when I don't need it.  Sometimes, I roll it into the kitchen if I am working on a project that requires a Larger space than the closet offers.


Monday, December 10, 2012

Makeover my closet.... on a budget

I posted a previous blog about closet systems  and listed several companies that  can help you achieve the perfect closet, unfortunately that perfect closet comes with a hefty price in most cases.

If you are more of a do- it - your selfer, then follow along with me while I walk you through the Makeover  I was able to do  in my Master bedroom closet.

Master Closet before photos:


1.  The first thing I did was  PURGE!!!!!.  I forgot to take photos before the purge, so these photos reflect a purged closet.  I took about 3 large garbage bags of clothes to GoodWill.

2.  Now I can begin the organizing and space planning based on the items I have left.  I made a list of all the items my husband and I  have (purses, bags, luggage, hats, belts, ties, etc and took measurements of the clothing items to better space plan for the length of each item.

Check out the  Storage Websites page  on my blog for a list of my favorite storage websites and stores.

Storage options  I considered for hats, purses, ties and belts:  
Product DetailsCapRack 9 - Baseball Cap Organizer (Black) (76.5"H x 1"W x 0.2"D)


I also took inventory of how many pairs of shoes and flip flops I now have after the GREAT PURGE!!!

Storage options I considered for shoes:

Lynk 15 Pair Convertible Shoe Rack24-Pocket Cotton Overdoor Shoe BagRolling 18-Pocket Shoe Bin - White


3.  Next, I took all the clothes out of my closet and did a thorough cleaning of the entire closet as it was a bit dusty.  Then I organized the clothes by type on my bed( shirts, skirts, pants, etc.) to give me a better idea of how much of each item I had and then created a space plan for the best  storage solution.  I really threw my husband for a loop as I ended up changing sides of the closet with him to better utilize the space.  He is still a bit lost in there...... but it looks really nice!!!!


Here are the results and choices I made........

Before                                                               After


PURSES ~ HATS ~ SWEATERS

I used the large  tan canvas totes (Kohls new organization line) to hold purses, bags and hats.  I did not have the extra wall or door space to use the hat or purse hanger I originally considered.  These helped contain and reduce the visible clutter of all the bags and purses.

I used clear front storage boxes (Kohls) to store and organize our sweaters and large sweatshirts.  I had been using large -clear plastic containers before, but they were bulky and hard to get down as well as there was just so much visibly exposed that it always looked very cluttered up top.   I really liked these because I can visually see what is in each box sweater box and since they are pretty high up I have to get a stool to reach them but know exactly which one to take down since I can see in them.   I also like that they are sealed to keep out dust and protect them a little better.

SHOES ~ SHOES ~ SHOES ~

I had shoes all over the floor of my closet plus on this small rack, after purging a few pair, I then counted my shoes and flip flops(as I live in these) as well as my husbands larger work shoes and came up with a plan to store them in 3 different ways:  1. Door hanger  2.  Shoe divider shelf  3.  Large shoe box


Before:
all over the floor
After:                                 

1. Door hanger
2. Shoe divider shelf (holds 16 pair)
For all you "SHOE  DIVAS" that have way mores shoes than this, you can add a second divider beside this one for more storage.
                                                     
3. Large shoe boxes


I used these large shoe boxes with clear windows to hold my husband's work-dress shoes.  We also found this dresser that was the perfect width and depth (Target) to hold my husbands socks, underwear, t-shirts, etc.  We just removed the lower clothes rod and slid the dresser in.  We needed space for folded things(dresser) and not the additional hanging space, so this worked for our specific needs.  This is why it is important to really plan and take inventory of what you have and the space you will need to hang or store each item.  


TIES: 
 I hung the tie rack in the space behind the closet door, it also holds belts!  A great use of  dead space!!!


HANGERS:

I almost forgot to tell you about the hangers!!!  I changed out all the white plastic hangers for the space saving velvet hangers that not only take up less space but also keep clothes from sliding off.  You used to only be able to find these at The Container Store, but now they can be found just about anywhere. (Walmart,Bed Bath & Beyond, Target, Marshalls and even Big Lots sometimes)


LUGGAGE:

I have a big collection of  bags but I did not want to see the clutter of all of them, so I picked  one of my favorite Vera Bradley bags and 1 piece of larger luggage and stored the rest of my collection inside these bags to give a cleaner, more organized feel.  We store all our our large luggage pieces in the attic(sealed in a large garbage bag.  Another idea is to use those large Christmas tree or wreath storage bags to protect and contain them in the attic or basement.  

Ahhhhh.......... an organized closet
Now lets keep it that way ~ honey!!!