There are many closet systems available to make over your closet and they range in price from $150 - $4,000 depending on the size and design options you chose for your space. A few of the closet systems manufacturers are as follows:
Container Store
Closet Factory
Closets By Design
Closet Maid
Easy Track/ORG
You can have the company install your closet system or you can save money by planning and installing it yourself. Space Planning is key to maximizing the storage space to accommodate your closet inventory. Here are some tips from ClosetMaid and EasyClosets.com:
1. Take inventory: make a detailed, itemized list of everything stashed in a closet and then you can determine how much space you will need for short and long- hanging items as well as whether you need drawers, shelves or both.
2. Plan for various heights: Measure shoe heights for tall heels and boots as well
3. Do the Math: Plan your hanging storage around the length of your clothes.
Standard vertical measurements for clothing items:
Women's Shirts: 36-40 in long
Men's Blazers and Shirts: 38-42 in long
Women's Skirts: 38-42in long
Women's long dresses and Coats: 60-70 in long
Women's cocktail dresses and pants hung by cuffs: 48-50 in long
Double-hung pants: 20 in long
Make Over Your Closet:
go to bhg.com/closetguide for a complete closet system guide
Thursday, December 13, 2012
Wednesday, December 12, 2012
An Organized Pantry
Pantry Before
.JPG)

Pantry After - (with added air tight containers, can 3 tiered organizer and door shelf)
I actually removed some of the wooden shelves to accommodate taller items that I had or would be putting into air tight containers.


I purchased the door storage at Home depot for about $30 and it gave me additional storage for items that I would not be putting into air tight containers.
The Air tight containers were purchased at Walmart (Better Homes and Garden line). Prices range from $4.99 - $9.99 depending on size and shape. The 3 tiered can shelf also came from Walmart and it expands. There is also a great organizer for cans that I really want that can hold a ton of cans and utilizes the space really well from organize.com, however it is a little pricey at $39.99 and since I was having to purchase all the plastic containers as well, I will wait on that splurge, but not too long!!!!
Here Comes the Labels!!!! The labels on the baskets are gift tags that I tied onto the baskets for items like bread and chips with jute rope. The craft paper labels on the plastic containers in the wall shelf are Martha Stewart - Craft labels from Staples. Martha Stewart (for Avery) has a huge selection of organizing labels at Staples including chalkboard labels.
.JPG)
.JPG)

Ahhhh.... clean, organized and easy to find
I store extra supplies behind these beautiful plastic containers so I am able to easily refill as they are used, but I don't have to look at all the boxes and packaging. The labels I used are also craft paper labels but I wanted them to be a little bigger so I went with a circle shape. These are from Avery (You can get them at Office Depot or Walmart). You can go online to avery.com/print and download the templates for any of these labels by just putting in the number it gives you.


Happy Organizing!!!!
Tuesday, December 11, 2012
Turn a small closet into an office you will love....
Tucked away in my guest room closet, I found the perfect space to organize my personal home office. Most would really like this idea as you can close the doors and not have to look at any of the mess or clutter most home offices have, however, this is now a space I am proud to show off and keep the doors open!!!
My husband was a big help with this project. He made a template out of cardboard to measure the space for a counter top. This space had some tough angles so we had to make sure we measured correctly ( remember measure twice and cut once or in our case measure twice and re cut several times) Its ok, my husband does not read this blog ( I hope).
We purchased a laminate counter top that resembled granite at home depot ( around $50) and transferred our template onto the back side. We then found the studs in the wall and attached 1x2 all along the wall where the counter top would attach to give it extra support and a surface for us to attach the counter top to. ( I am sorry I do not have any before or along the way photos, I was not a blogger then, just an obsessed home organizer)
.JPG)
Now onto the organizing........!!!!!!
I purchased this great bulletin board with open compartments at the bottom at my favorites store, Marshall's-Home Goods. I can put info on the bulletin board and then keep smaller items like pens, pencils, markers, scissors, etc stored and up off the counter top. Anytime you can organize and store things vertically, you are creating extra space and keeping your work space clutter free.
I also hung a black wicker wall filing system (yes, found at the greatest store on earth - Marshalls). I put paper and file folders in this and again this really helps keep my desk top clean and clear for me to do art projects or sewing. (lucky for me the builder put a plug in this closet so I can use my sewing and laminating machine there and plug in a task lamp for projects..... love it!!!). Lastly, I added the black magazine organizers (from Container Store) to hold paper, labels, magazines, and catalogs. I liked these because they camouflaged all the clutter for me and I could label them for easy reference. There are many stores like Target, Walmart and yes even Marshalls that carry these in different finishes from plastic to fabric to even wicker. You just have to shop around and find the style that works for your space. I wanted to keep it clean and modern in this space and not have a lot of distractions while I was working and creating in the space.

We removed the larger clothes hanging rod that went across to entire closet and I bought a smaller dowel rod that could hold ribbon spools and only hung it over half the closet. to keep the space more open in front of the bulletin board.

There was still a little space underneath the counter top and as any other obsessed organizer would do, I had to make use of every last inch, so I found a plastic container on wheels (Container Store) that can hold supplies. I store all my crafting supplies like hot glue gun, glues, stamping, labels, sewing supplies, etc. in these drawers. I can roll it out for better access and tuck it back under out of the way when I don't need it. Sometimes, I roll it into the kitchen if I am working on a project that requires a Larger space than the closet offers.

My husband was a big help with this project. He made a template out of cardboard to measure the space for a counter top. This space had some tough angles so we had to make sure we measured correctly ( remember measure twice and cut once or in our case measure twice and re cut several times) Its ok, my husband does not read this blog ( I hope).
We purchased a laminate counter top that resembled granite at home depot ( around $50) and transferred our template onto the back side. We then found the studs in the wall and attached 1x2 all along the wall where the counter top would attach to give it extra support and a surface for us to attach the counter top to. ( I am sorry I do not have any before or along the way photos, I was not a blogger then, just an obsessed home organizer)
.JPG)
Now onto the organizing........!!!!!!
I purchased this great bulletin board with open compartments at the bottom at my favorites store, Marshall's-Home Goods. I can put info on the bulletin board and then keep smaller items like pens, pencils, markers, scissors, etc stored and up off the counter top. Anytime you can organize and store things vertically, you are creating extra space and keeping your work space clutter free.
I also hung a black wicker wall filing system (yes, found at the greatest store on earth - Marshalls). I put paper and file folders in this and again this really helps keep my desk top clean and clear for me to do art projects or sewing. (lucky for me the builder put a plug in this closet so I can use my sewing and laminating machine there and plug in a task lamp for projects..... love it!!!). Lastly, I added the black magazine organizers (from Container Store) to hold paper, labels, magazines, and catalogs. I liked these because they camouflaged all the clutter for me and I could label them for easy reference. There are many stores like Target, Walmart and yes even Marshalls that carry these in different finishes from plastic to fabric to even wicker. You just have to shop around and find the style that works for your space. I wanted to keep it clean and modern in this space and not have a lot of distractions while I was working and creating in the space.


There was still a little space underneath the counter top and as any other obsessed organizer would do, I had to make use of every last inch, so I found a plastic container on wheels (Container Store) that can hold supplies. I store all my crafting supplies like hot glue gun, glues, stamping, labels, sewing supplies, etc. in these drawers. I can roll it out for better access and tuck it back under out of the way when I don't need it. Sometimes, I roll it into the kitchen if I am working on a project that requires a Larger space than the closet offers.

Monday, December 10, 2012
Makeover my closet.... on a budget
I posted a previous blog about closet systems and listed several companies that can help you achieve the perfect closet, unfortunately that perfect closet comes with a hefty price in most cases.
If you are more of a do- it - your selfer, then follow along with me while I walk you through the Makeover I was able to do in my Master bedroom closet.
Master Closet before photos:

.JPG)
.JPG)
1. The first thing I did was PURGE!!!!!. I forgot to take photos before the purge, so these photos reflect a purged closet. I took about 3 large garbage bags of clothes to GoodWill.
2. Now I can begin the organizing and space planning based on the items I have left. I made a list of all the items my husband and I have (purses, bags, luggage, hats, belts, ties, etc and took measurements of the clothing items to better space plan for the length of each item.
Check out the Storage Websites page on my blog for a list of my favorite storage websites and stores.
Storage options I considered for hats, purses, ties and belts:


I also took inventory of how many pairs of shoes and flip flops I now have after the GREAT PURGE!!!
Storage options I considered for shoes:


3. Next, I took all the clothes out of my closet and did a thorough cleaning of the entire closet as it was a bit dusty. Then I organized the clothes by type on my bed( shirts, skirts, pants, etc.) to give me a better idea of how much of each item I had and then created a space plan for the best storage solution. I really threw my husband for a loop as I ended up changing sides of the closet with him to better utilize the space. He is still a bit lost in there...... but it looks really nice!!!!
Here are the results and choices I made........
Before After


PURSES ~ HATS ~ SWEATERS
I used the large tan canvas totes (Kohls new organization line) to hold purses, bags and hats. I did not have the extra wall or door space to use the hat or purse hanger I originally considered. These helped contain and reduce the visible clutter of all the bags and purses.
I used clear front storage boxes (Kohls) to store and organize our sweaters and large sweatshirts. I had been using large -clear plastic containers before, but they were bulky and hard to get down as well as there was just so much visibly exposed that it always looked very cluttered up top. I really liked these because I can visually see what is in each box sweater box and since they are pretty high up I have to get a stool to reach them but know exactly which one to take down since I can see in them. I also like that they are sealed to keep out dust and protect them a little better.
SHOES ~ SHOES ~ SHOES ~
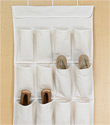
I had shoes all over the floor of my closet plus on this small rack, after purging a few pair, I then counted my shoes and flip flops(as I live in these) as well as my husbands larger work shoes and came up with a plan to store them in 3 different ways: 1. Door hanger 2. Shoe divider shelf 3. Large shoe box
Before:
For all you "SHOE DIVAS" that have way mores shoes than this, you can add a second divider beside this one for more storage.
TIES:

If you are more of a do- it - your selfer, then follow along with me while I walk you through the Makeover I was able to do in my Master bedroom closet.
Master Closet before photos:

.JPG)
.JPG)
1. The first thing I did was PURGE!!!!!. I forgot to take photos before the purge, so these photos reflect a purged closet. I took about 3 large garbage bags of clothes to GoodWill.
2. Now I can begin the organizing and space planning based on the items I have left. I made a list of all the items my husband and I have (purses, bags, luggage, hats, belts, ties, etc and took measurements of the clothing items to better space plan for the length of each item.
Check out the Storage Websites page on my blog for a list of my favorite storage websites and stores.
Storage options I considered for hats, purses, ties and belts:
I also took inventory of how many pairs of shoes and flip flops I now have after the GREAT PURGE!!!
Storage options I considered for shoes:
3. Next, I took all the clothes out of my closet and did a thorough cleaning of the entire closet as it was a bit dusty. Then I organized the clothes by type on my bed( shirts, skirts, pants, etc.) to give me a better idea of how much of each item I had and then created a space plan for the best storage solution. I really threw my husband for a loop as I ended up changing sides of the closet with him to better utilize the space. He is still a bit lost in there...... but it looks really nice!!!!
Here are the results and choices I made........
Before After


PURSES ~ HATS ~ SWEATERS
I used the large tan canvas totes (Kohls new organization line) to hold purses, bags and hats. I did not have the extra wall or door space to use the hat or purse hanger I originally considered. These helped contain and reduce the visible clutter of all the bags and purses.
I used clear front storage boxes (Kohls) to store and organize our sweaters and large sweatshirts. I had been using large -clear plastic containers before, but they were bulky and hard to get down as well as there was just so much visibly exposed that it always looked very cluttered up top. I really liked these because I can visually see what is in each box sweater box and since they are pretty high up I have to get a stool to reach them but know exactly which one to take down since I can see in them. I also like that they are sealed to keep out dust and protect them a little better.
SHOES ~ SHOES ~ SHOES ~
I had shoes all over the floor of my closet plus on this small rack, after purging a few pair, I then counted my shoes and flip flops(as I live in these) as well as my husbands larger work shoes and came up with a plan to store them in 3 different ways: 1. Door hanger 2. Shoe divider shelf 3. Large shoe box
Before:
 |
| all over the floor |
After:
 |
| 1. Door hanger |
 |
| 2. Shoe divider shelf (holds 16 pair) |
 |
| 3. Large shoe boxes |
I used these large shoe boxes with clear windows to hold my husband's work-dress shoes. We also found this dresser that was the perfect width and depth (Target) to hold my husbands socks, underwear, t-shirts, etc. We just removed the lower clothes rod and slid the dresser in. We needed space for folded things(dresser) and not the additional hanging space, so this worked for our specific needs. This is why it is important to really plan and take inventory of what you have and the space you will need to hang or store each item.
TIES:
|
| I hung the tie rack in the space behind the closet door, it also holds belts! A great use of dead space!!! |
HANGERS:
I almost forgot to tell you about the hangers!!! I changed out all the white plastic hangers for the space saving velvet hangers that not only take up less space but also keep clothes from sliding off. You used to only be able to find these at The Container Store, but now they can be found just about anywhere. (Walmart,Bed Bath & Beyond, Target, Marshalls and even Big Lots sometimes)

LUGGAGE:
I have a big collection of bags but I did not want to see the clutter of all of them, so I picked one of my favorite Vera Bradley bags and 1 piece of larger luggage and stored the rest of my collection inside these bags to give a cleaner, more organized feel. We store all our our large luggage pieces in the attic(sealed in a large garbage bag. Another idea is to use those large Christmas tree or wreath storage bags to protect and contain them in the attic or basement.
Ahhhhh.......... an organized closet
Now lets keep it that way ~ honey!!!
Sunday, December 9, 2012
Master Bedroom Makeover
Creating a master bedroom retreat......
Bed Linens
My color inspiration for the master bedroom makeover came from these beautiful linen and sea foam down pillows I found at a great home decor shop, Picket Fences . I am a big fan of mixing up your bed linens and not using the "matchy - matchy" bed in a bag sets. You can always use parts of the bed in a bag as you can find some great deals, but mix it up and layer with coordinating duvets and pillows.
It just gives a more custom, high end look.

Making the Bed...
I started to build my bed with 3 linen colored Euro Shams I found at IKEA ( what a great buy they were for only $6 each for the covers) I already had the euro size pillow inserts, but you can find them almost anywhere these days. (Target, TJ MAX, Marshalls/Homegoods, etc.) Then I added my 2 inspiration pillows in front of the 3 linen euros. They have the same Linen color as the ones I purchased from IKEA along with my accent color - Sea Foam. These were definitely a splurge I would not normally make, but I think they were totally worth it and as I said, they were my inspiration for the master makeover.
*(I often start many home staging and/or re-decorating projects by finding a pillow or other decor piece that has the colors a homeowner really loves and then we build from there. )

*(I like to use clean, crisp, white sheets on the bed and expose the linens. In the winter, I like to add a matelasse coverlet and then fold the duvet cover over the foot of the bed. The duvet cover I used which was also part of my inspiration for the master - makeover, was from Rachel Ashwell -Shabby Chic line from Target. It was the perfect mix of white, linen and sea foam and it pulls together all the colors of my pillows and linens. )
Project 1: Refurbish dressers
My first project in the master bedroom makeover was to refurbish the dressers/nightstands on each side of the bed. I found them on a clearance sale at Kirkland's a while back. They were a great deal because they were scratch and dent. I knew I had plans to eventually paint them, so no worries there. I touched up the scratches and dents with dark Old English until I was ready to paint.
They are not your traditional nightstand, but I love using unexpected pieces in different ways as well as they provide great storage and let's be honest we all need more storage!!!


Since my color palette was already decided by my choice in linens, I chose to lighten things up with the dressers as well. I wanted to make them look light and airy with a vintage feel.
1. First, I removed the old hardware and lightly sanded to rough up the surface enough to allow the new paint to adhere and painted 2 coats of paint in "evasive blue" it is white with a hint of blue/gray.
2. I then lightly sanded and rubbed the edges or any place that would naturally wear or age more.
3. Next, I wanted to warm it up and decided to add glaze to the top and drawer fronts to give it more of an aged depth and detail. I taped off the edge of the top surface with blue painter's tape and applied the glaze and wiped off until I got my desired effect. The drawers were super easy as I did not half to tape anything off. I Just applied the glaze over the already painted drawer fronts and again wiped off to my desired effect.
4. Finally to finish the piece, I added glass knobs ( from Hobby Lobby) to give it that vintage feel. You can find them at your local home improvement store as well, I just thought the ones from Hobby Lobby had more of a vintage look and feel. I have to admit, it is a bit feminine, but having the simple glass lamp with burlap shade helps to maintain some of its masculine features and my husband loves it. You can stack some books and place a beefy wooden frame for more masculinity.

Now, onto the wall.....Creating a custom look of wallpaper
I had already painted the entire room in a soft linen color, but wanted to create an accent wall for my bed. I had recently found a great buy on upholstered linen, nail head, king size headboard from Tuesday Morning, (however, it blended in with the wall color. To give the headboard more presence,I decided to:
1. Hang it on the wall to give it more height and more of a presence on the wall. It has now become the art work for that wall.
2. Next, I decided to paint the wall behind the headboard to give it more contrast and as well as a focal wall when you entered the room.
Let's start painting......
I started with 2 coats of Martha Stewart - metallic paint. Whoa!!!! I was not quite ready for that and was really second guessing myself as it looked more like a disco??? Can you say "bow chicka wow wow!!!"
Thank God my husband was in Europe during this several day process or he would have thought I had lost my mind or maybe he would have liked it, because it looked more like a brothel????
I had already committed to the metallic paint, so I decided to continue on my journey to try and create the look of wallpaper with a damask pattern without the hassle of having to take down wallpaper later ( I do like to change things up a bit and wallpaper is a huge pain to remove, with paint, you just paint over!!!)
Stage 1 - Metallic paint

Stage 2 - Hand painting stencil -(applied on half of wall)
( I got mine from Wall to Wall Stencil , but you can find them at Hobby Lobby and Home Depot in many different options). They also provide you with tips on how to stencil

Stage 3 - Apply glaze over painted wall and stencil to create warmer, aged effect
(applied on half of wall)

The Final Reveal
A Relaxing Master Retreat Makeover.......


One last final touch .....
I am from the south and we like to personalize everything so I took a pillow cover I found in the right color scheme and had it embroidered with mine and my husbands initials along with our last name initial. The perfect final touch to a beautiful master bedroom retreat.

This is an armoire I refurbished many years ago. It was honey pine before....( I am sorry I was not thinking about taking before and after photos back then???) It has been all over our house , but it has a new home now and offers us great storage along with concealing our tv. I simply added some glass apothecary jars with an antique bird cage on top to finish the look....

Oh !!!! I almost forgot.....
I changed the hardware to these vintage knobs, just the perfect jewelry to finish it!!!

Friday, December 7, 2012
Home staging tips to sell your home
Ready~Set~Stage!!!
~The first step of staging is to CLEAN, CLEAN, CLEAN!!!
- Bathrooms and kitchens should be cleaned from top to bottom and should shine
- Wash windows
- Shampoo carpets (to remove soiled spots or pet odors)
- Paint touch ups or new neutral color applied to appeal to potential buyers
~The next step is to remove the CLUTTER!!!
- Counter tops should be clear of paper, small items, etc. to maximize visual space
- Personal photos should be packed away
- Remove and store extra furniture
- Clean out and organize closets
*Remember, you are selling your house not your personal belongings, and you want potential buyers to visualize their things in your space. You are going to pack it all up when you move, so why not get a head start?!!
~RE-DESIGN is the next step that can really maximize the potential of your home.
- Re-position or remove furniture to maximize flow and space
- Accessorize using existing items by re-using them in innovative ways
- Supplement with added accessories such as lamps, rugs, vases, plants or furniture, as needed
~Finally, the EXTERIOR CURB APPEAL should really draw potential buyers inside. Your curb appeal is the first impression you give a potential buyer.
- The front should be neat and swept
- Landscaping trimmed and lawn manicured
- Colorful flowers in pots or beds along entryway
- Repairs made to any areas needed
Thursday, December 6, 2012
Counter top Clutter in the kitchen......
I have conquered the pantry!!!! , ( see my post An Organized Pantry )
Now on to the paper clutter issue in my kitchen. Despite signing up for everything possible to be sent to me online from my children's school, they still bring home tons of notes and paperwork that need some kind of organization and my kitchen counter top is not the answer!!! Can I get an AMEN!!!! I can clean off that counter top and with in minutes it is covered. Well it is not all paper work, but I thought I would start with tackling this first as it is easier than training my family to PUT UP THEIR STUFF!!!!! Some of it is art that I put in a special binder in their room, some of it is information for me on upcoming events and classroom info and some of it is homework or projects due at a later date. In addition I also have all the schedules and rosters for their extra curricular activities and sports that we need to see daily.
When my husband and I remodeled, we had this small little area at the end of our cabinets that was not being utilized, so we decided to add a small kitchen desk ( with remnants left over from our slab of granite) and a small wicker shelf with drawers for extra supplies. I store TO-GO MENUS in the bottom drawer and kids school supplies like markers, colors and extra paper they may need for homework in the others.

It is this space that has now become the answer to my paper clutter issue in my kitchen. I have a personal office( well if you count the organized space I have created in our guest room closet) for our bills and my personal business organization. ( I will tell you all about that in an upcoming post). So this new kitchen system is just for me to organize my children's papers, activities and schedules. I added a basket organizer with divided sections to hold folders with each of their names, a note pad for notes that I may have to send into school( I had some pre-printed with their name and my name so I can quickly send a note for each child) and pencils/pens for homework.

I then added a framed bulletin board above the desk( which I made myself from a ready made frame, some cork board and paint) as I could not find one at that time that was large enough. Now of course I see them everywhere at Marshall's- Home Goods and Target. I personalized it with each child's name and then put their schedules or important reminders in their own area. This creates an easy, quick glance at all our family's activities while still being organized and clutter free.

Kitchen Paper Clutter Conquered!!!!!!!
Now If I just could get my family to pick up the rest of the clutter on my counter tops. One project at a time!!!!
Monday, December 3, 2012
Professional Organizing - before and after photos
Check out the new photos on my Photos - Professional Organizing page for some great before and after photos on the following:
1. Pantry
2. Master bedroom closet
3. Home office - in a closet
4. Kitchen organization center
1. Pantry
2. Master bedroom closet
3. Home office - in a closet
4. Kitchen organization center
Tuesday, May 22, 2012
Simplify, Simplify, Simplify ......
We all want to simplify our lives. Sometimes, we get caught up in our material possessions and forget about what is really important in our lives. My neighbors husband recently passed away and it really made me start thinking about living a much simpler life. My family's busy schedule, just as many of yours, keeps us running and thus leaves little time for much else.
I try to keep our home simple and organized through smart organizational solutions that allow us to find things easier and create a home for those things we really use and need. I do not have lots of extra closets or storage space in my home, thus I really have to not only organize our things very efficiently, but also I have to purge and clean out often to make sure we really need and use all the things I am trying to store. This brings me back to the statement about "simplifying our lives". Make sure you really do need and use all the "stuff" you are storing. Cleaning out and purging those things you don't need or wear can really make your life simpler and less stressful.
One of my favorite blogs, The Joyful Organizer, just wrote a wonderful piece on this topic. Follow this link for the complete article. It is definitely one worth reading. Here is a short summary of her comments:
Own Your Possesions - Part one posted May 22, 2012 by: The Joyful Organizer
“Simplify, Simplify, Simplify”
–Henry David Thoreau
So much of our identity is tied to
our material possessions; our homes, our clothes, our cars and our gadgets.
We identify ourselves through these items instead of through our actions.
We end up spending so much time and money caring for our items, storing them,
maintaining them, that we sometimes don’t have time to do the things we love
anymore.
When you first stop and think about
your stuff (clothes, shoes, electronic devices, just for starters), it all
seems very meaningful to you. You simply can’t imagine parting with all
the things you have.
Visualize your life without
the excess stuff. Would you be able to make it out of the house more
quickly and with less stress in the morning? Would your kids have more
room to play? If you weren’t always looking for things you can’t find,
would you be able to play with your kids in the yard? If your garage were
clean, would you be able to pull the car inside and better care for it?
If you had more time in your day, could you squeeze in a workout?
What if the only clothes in your closet were clothes you actually wear
and feel good in?
We spend time cleaning and
caring for all of our items instead of taking care of our health, and we even
sometimes avoiding having people over to our homes because we feel the clutter
is too embarrassing.
We all deserve to live better, more
fulfilling lives that are filled with relationships instead of stuff. The
time to start living a simpler life is now.
I could not have said it better myself, THE TIME TO START LIVING A SIMPLER LIFE IS NOW!!!!!!
Thursday, May 17, 2012
Home Staging - before and after photos
Check out the new before and after photos on my Photos - Home Staging page of my blog.
Wednesday, May 9, 2012
A Home Filing System..... that makes sense!
There are 4 must - have sections for your Home Filing System ( Better Homes and Garden Storage - Spring 2012 )
The article recommends dividing the drawers into 4 color-coded sections as follows:
1. Financial (green) - for incoming or outgoing money such as banking, credit cards, investments, mortgage, taxes(current year only), utilities and estate planning.
2. Insurance/Vehicles (blue) - home owners, auto, life and health as well as files for maintenance and registration of vehicles
3. Personal (yellow) - Create one file for each family member and pet to organize items such as medical records, education, church sports, hobbies, etc.
4. Home (red) - use this final section to organize home maintenance, improvements or repairs as well as past and future home projects and home owners association.
How Long should you keep it? ..... Get the Better Homes and Garden handy guidelines at bhg.com/paper
So here is a picture of my attempt at the BH&G Color Coded Home Filing System ...... now if those papers can just find their way into their beautiful file!!!!

I took this a step further and decided to organize my tax returns as well since the BH&G article recommends only keeping the current year in your easy to access color coded system, I had to find something to do with the previous years. I store this container in the top of a closet since we do not access it often. I printed out labels with dates for each tax year as well as future tax years. Take a look.....

Another important note the BH&G article makes is to protect legal documents. These documents do not belong in your home filing system but rather in a safety deposit box or fire safe box.
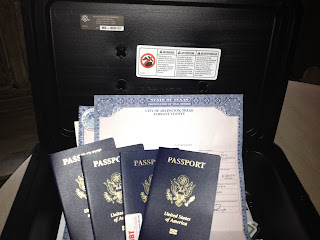
I purchased a small Water and Fire Safe box at Walmart for around $30 to store birth certificates, passports and other important legal documents. Great investment for keeping important items safe and easy to grab in case of emergency.

Financial ~ Insurance ~ Personal ~ Home
The article recommends dividing the drawers into 4 color-coded sections as follows:
1. Financial (green) - for incoming or outgoing money such as banking, credit cards, investments, mortgage, taxes(current year only), utilities and estate planning.
2. Insurance/Vehicles (blue) - home owners, auto, life and health as well as files for maintenance and registration of vehicles
3. Personal (yellow) - Create one file for each family member and pet to organize items such as medical records, education, church sports, hobbies, etc.
4. Home (red) - use this final section to organize home maintenance, improvements or repairs as well as past and future home projects and home owners association.
How Long should you keep it? ..... Get the Better Homes and Garden handy guidelines at bhg.com/paper
So here is a picture of my attempt at the BH&G Color Coded Home Filing System ...... now if those papers can just find their way into their beautiful file!!!!

I took this a step further and decided to organize my tax returns as well since the BH&G article recommends only keeping the current year in your easy to access color coded system, I had to find something to do with the previous years. I store this container in the top of a closet since we do not access it often. I printed out labels with dates for each tax year as well as future tax years. Take a look.....

Another important note the BH&G article makes is to protect legal documents. These documents do not belong in your home filing system but rather in a safety deposit box or fire safe box.

I purchased a small Water and Fire Safe box at Walmart for around $30 to store birth certificates, passports and other important legal documents. Great investment for keeping important items safe and easy to grab in case of emergency.

Subscribe to:
Posts (Atom)